


| Brother Tyler |
| 1 person marked this as a favorite. |

With regard to choosing a location because of its challenges when it is a real challenge, my group will take one of two different approaches, depending upon the overall challenge of the scenario:
1. When closing a location is difficult or painful (i.e., "discard/bury/banish a card or take damage type locations), we tend to explore it first. This gives our characters enough time to recover (i.e., heal) for the endgame. Also, the locations that are easier to close are the ones that will be occupied when we are seriously attempting to corner and defeat the villain.
2. When closing a location is difficult or painful (as above) we might save it for last, trying to chase the villain to that location so that we don't have to go through the pain of closing if we are able to defeat the villain.
Both options depend upon a lot of factors, though we'll usually opt for option 1 on our first run through a scenario and move to option 2 on subsequent attempts.
The above doesn't counter the advice that Shannon provided, though.
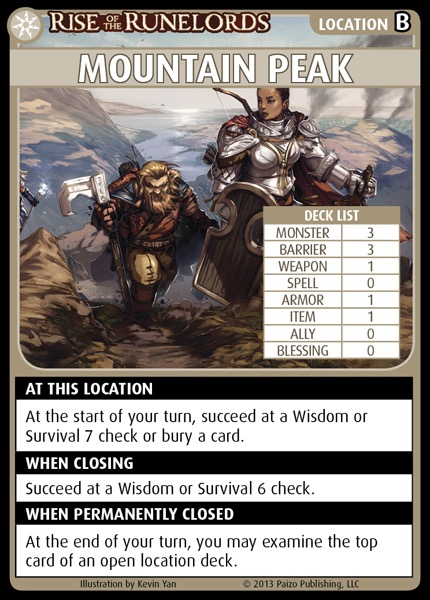
Also, the link to the Mountain Peak image isn't working. :(


|
|
| 1 person marked this as a favorite. |
So wait, which one of them is the maverick?
Didn't see that question coming—I was expecting "which one of them is the by-the-book veteran?"
| Frencois |

Great blog as usual.
If I may, you could add a few ideas concerning the order in which you can select locations to explore/close. We are a large group and those following things also come into consideration:
- If closing a specific location has a positive/negative impact on the rest of the game (like if closing gives you a +/- on specific checks for the rest of the game, or allows you to remove haunts or gives you access to a given loot, or forces you to banish/bury important stuff, and so on). Remember you can win most games without suffering the closing effect of a specific location, it's just a matter of cornering the villain elsewhere and just having to temp close the nasty location.
- If the condition to close a specific location is really difficult to reach (like a check that nobody in your group is good at), then it may be a good idea to "send" the villain there, by emptying that location without closing it, and then spreading the group on the other locations.
- If a location has a positive/negative impact only by exploring it (like encountering monsters here creates monsters elsewhere...), then keep it for last. Maybe you will just have to temp close it and never need to explore it.
| Frencois |
TOZ wrote:So wait, which one of them is the maverick?Didn't see that question coming—I was expecting "which one of them is the by-the-book veteran?"
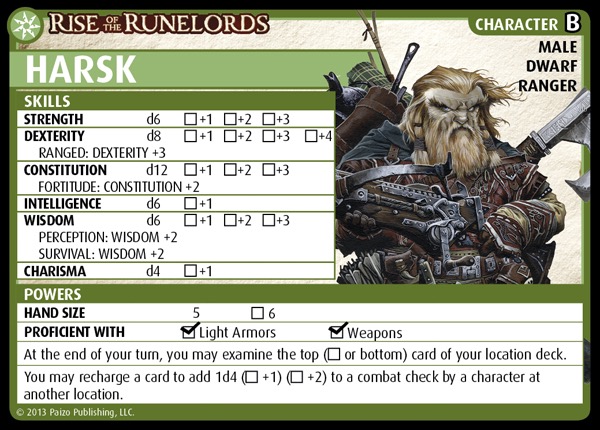
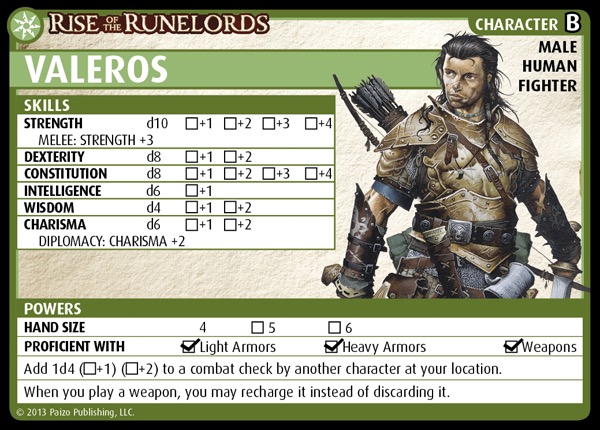
Speaking of Valeros, we call it Lethal Weapon, thinking of how many bad guys this man defeated during his one week before retirement.
| ShannonA |

This was the introduction to locations. I talk more about closing locations in part six, and the first two sections are "visit the hard-to-close locations first" and "save the impossible-to-close locations for last", which sounds uncannily like what Brother Tyler said.
And Frencois' comments on beneficial and harmful location is quite a good addition. Something I should add if I ever take these to a full book.
| Mike Selinker Lone Shark Games |

This was the introduction to locations. I talk more about closing locations in part six, and the first two sections are "visit the hard-to-close locations first" and "save the impossible-to-close locations for last", which sounds uncannily like what Brother Tyler said.
SPOILERS, MAN.
| zeroth_hour2 |

I now literally include that as part of my "teaching the game" spiel - "you should probably start at a location you can close"
| Frencois |
This was the introduction to locations. I talk more about closing locations in part six, and the first two sections are "visit the hard-to-close locations first" and "save the impossible-to-close locations for last", which sounds uncannily like what Brother Tyler said.
And Frencois' comments on beneficial and harmful location is quite a good addition. Something I should add if I ever take these to a full book.
Sorry Shannon, didn't want to spoil anything from your next (great as usual I'm sure) blog. Feel free to reuse/modify any remark you think valuable. Speaking of book, I'm doing a best of from all those blogs as an help to new players at my table and it's a big big help. Keep going and thanks a lot.
 ryric
RPG Superstar 2011 Top 32
ryric
RPG Superstar 2011 Top 32
|

When I play solo, I generally sort the locations from easiest to close to hardest, figuring that way the most difficult will have the villain and I won't have to make the check. Heck, it's not rare to never have to make a closing check but instead to fight the villain three times.
When playing with multiple people, we almost always save "banish to close" locations for last, in the hope that we won't have to actually do it.
Another strategy is to prioritize locations based on their "when permanently closed" text. It does little good to go straight for a location that heals you when closing, if you're not going to be damaged when the time comes. Or locations that give +2 vs a creature type when all the henchmen and villain are that type become a higher priority.
| Iff |

When playing with multiple people, we almost always save "banish to close" locations for last, in the hope that we won't have to actually do it.
It's funny. I like to get these done as quickly as possible, to avoid the possibility that I'll have to temp-close it later, possibly several times.
Also, this gives me the most focus to grab a card I won't mind banishing (such as a boon I just picked up and have no use for. I'd normally discard it, but would rather burn through a location quickly to banish this card and get it out of my hand.)
| Brother Tyler |
I think that all of these factors illustrate why the decisions are complex and "artsy" (rather than "scientsy"). The solo play (presumably a single character) is an example of how temporarily closing isn't a factor, so you can chase a villain around without having to worry so much about the painful closing conditions. Larger parties, meanwhile, will most likely have to contend with temporarily closing locations, possibly multiple times, so those locations with painful closing conditions might be good candidates to get out of the way early (and only once). And these all drive other strategies and tactical considerations that appear to be coming in the next two or more installations of the advice that Shannon is providing (as well as in previous blog entries).
I must say that I look forward to these blog entries as they both validate many of the decisions that my own playing group has made, but, and far more importantly, have given us many things to think about in terms of doing things better and differently. And this doesn't only draw upon what Shannon has posted, but also on the comments provided by other players.
| Rebel Song |
| 1 person marked this as a favorite. |

My group only has a couple of rules.
1. If we need to worry about temp-closing, go to where you can close.
2. Save healing locations for the end (like the Surgery).
3. Always go to the Warrens last.
4. Leave Holy Isle for Eliandra.
 TriOmegaZero
|

I now literally include that as part of my "teaching the game" spiel - "you should probably start at a location you can close"
Because coffee is for closers.
 Calthaer
|

My group only has a couple of rules.
1. If we need to worry about temp-closing, go to where you can close.
2. Save healing locations for the end (like the Surgery).
3. Always go to the Warrens last.
4. Leave Holy Isle for Eliandra.
I would have proposed a fifth: "Don't let Tyler near the Family Tomb." Except the recent ruling on that card makes it much less deadly for the entire group.
 Eliandra Giltessan
|

Rebel Song wrote:I would have proposed a fifth: "Don't let Tyler near the Family Tomb." Except the recent ruling on that card makes it much less deadly for the entire group.My group only has a couple of rules.
1. If we need to worry about temp-closing, go to where you can close.
2. Save healing locations for the end (like the Surgery).
3. Always go to the Warrens last.
4. Leave Holy Isle for Eliandra.
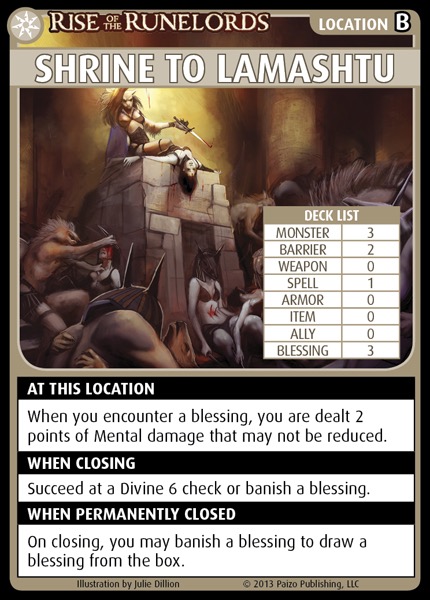
Taking Holy Isle from me is much more dangerous. But. I will usually take the Shrine to Lamashtu, for similar reasons.

| Midnight Anarch |

I now literally include that as part of my "teaching the game" spiel - "you should probably start at a location you can close"
I find myself imagining, as you give that instruction, that your facial expression is exactly the same as your avatar.
| Kreniigh |

In the digital game, I've gotten into the habit of sending the team supreme Valeros and Lem into new scenarios first. And I rarely split them up.
| Yunni |
| 1 person marked this as a favorite. |

I've gotten RotR Ezren through the Academy in one turn before because he's almost guaranteed to get at least one extra exploration per turn (as the Academy will give him one unless his first exploration encounters a spell, in which case he's likely to acquire it and get a free explore through his ability) and is excellent at acquiring all the spells and magic items he encounters on subsequent explorations, giving him even more free explores. When he runs into something like an ally he can recharge a spell like Haste to keep it going even longer!