


| LoreKeeper |

I wish one of my fellow gamers would get into this kind of thing. Sculpting terrain, and environment features, would be great for my game table.
| Chef's Slaad |

Sean,
I really like this series, and I hope you're able to do a lot more posts allong these lines.
Are you going to walk us through the building of some actual models or set pieces in this series?
| GM Hands of Fate |

Great Stuff, Sean! As a wargamer as well as a roleplayer, I do make my own terrain. I've done foam terrain, Hirst Arts studd, glay stuff. I hope you will continue this series with a post on cardstock terrain.
 Robert Hawkshaw
|

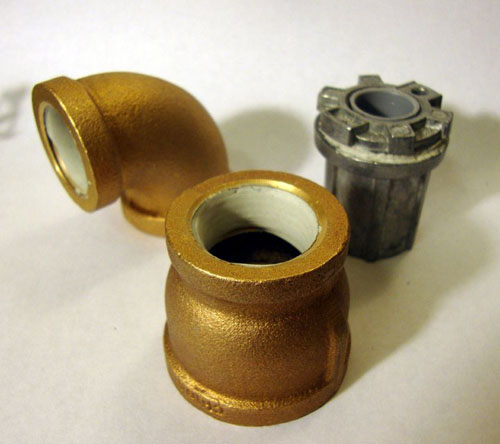
Re: Kneadatite. You can buy this stuff far more economically from a plumbing supply store. It's just plumbing epoxy. I used to stock boxes of it when I worked for a wholesaler. Just ask for Kneadatite Blue/Yellow, the manufacturer is Polymeric Systems.
It should cost like 10 bucks for a 36 inch roll of two part tape. Less if you go to a good store, I know ours gave a 20-30% discount off MSRP to non-contractors and 50% off to anyone with a plumbing ticket.
| Sean K Reynolds Contributor |
Hmm, I'll have to investigate that. Normally the tape isn't as good as the tubes because where the two halves connect (down the center line of the tape), it hardens, which means you have an unusable chunk down the middle--I'd say about 20% or so.
|
Robert Hawkshaw
|
Hmm, I'll have to investigate that. Normally the tape isn't as good as the tubes because where the two halves connect (down the center line of the tape), it hardens, which means you have an unusable chunk down the middle--I'd say about 20% or so.
You should be able to buy the tubes (they call them bars) as well, same supplier just a different package. Both are 100 grams if I recall correctly.
The warstore has a decent price, especially compared to the highway robbery that Games Workshop is trying to pull selling 20 grams for a little more than what a 100g tube or strip will cost. (GW charges 12 dollars CAD for 20 grams).
http://www.polymericsystems.com/images/faq/Epoxies/SculptorInfo%284109-EM07 %29.pdf
| brassbaboon |

I'll check out the link Robert. I went to Home Depot, Lowes and local hardware stores on advice exactly the same as yours. They all carry a product called "plumbers putty" that is not epoxy, and they have two part gray epoxy under another name, but it hardens in like ten minutes. I asked and the Home Depot said they stopped carrying the "old kind" a few years ago. So the online link might be the best way to go. At least if your hardware stores have made the same stocking decisions mine have.
|
Robert Hawkshaw
|
I'll check out the link Robert. I went to Home Depot, Lowes and local hardware stores on advice exactly the same as yours. They all carry a product called "plumbers putty" that is not epoxy, and they have two part gray epoxy under another name, but it hardens in like ten minutes. I asked and the Home Depot said they stopped carrying the "old kind" a few years ago. So the online link might be the best way to go. At least if your hardware stores have made the same stocking decisions mine have.
If your home depot won't order it in for you try one of the stores on this page, but be sure to price check:
http://polymericsystems.com/epoxies-adhesives/epoxy-putty-tapes/where-to-ge t-kneadatite-blue-yellow.htmOr here:
http://www.jdindustrialsupply.com/knblepta.html
I'd normally not link away from paizo, but a x3 mark up when you buy from the hobby trade is too big a price mismatch, given that its an identical product and there aren't any amazon.com long tail shenanigans going on.

| brassbaboon |
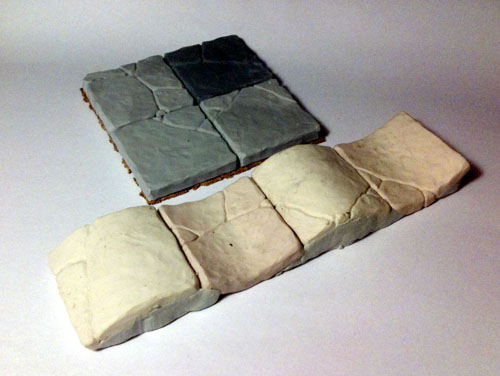
Sean, these are definitely fantastic resources that should be bookmarked. I have used a lot of sculpey for terrain, particularly for walls. You can make a really realistic looking stone wall just by rolling little balls of sculpey clay and pressing them together just enough to stick to each other as if you were building a wall out of stones. In just a few minutes, plus some baking time, you can have a beautiful stone wall, or even a stone cottage. Ruins are especially easy to make. After you bake it you can paint it and sprinkle some florist lichen/moss on it and presto, an ivy covered stone wall.
I made a little cemetary with sculpey gravestones and stone walls by glueing them down to a piece of foam core poster board. I saw somewhere else where someone recommends using old promotional CDs as portable terrain bases. That's pretty useful too.
You know what I'd love to see? Something about making furniture and internal decorations to populate those houses, cottages and palaces that we make.
| Abraham spalding |

Not to complain -- I love war terrain modeling as much as the next Warhammer 40k aficionado -- but wasn't design Tuesdays supposed to be about game design and theory with a special emphasis on pathfinder rules?
I like this new series... but it simply doesn't apply for me -- I'm not going to model terrain for each of my encounters and if I want to model terrain I'm much more likely to do it for Warhammer 40k or Warhammer than pathfinder -- and therefore find more advice for it with those companies.
Now again I don't want to say this is bad stuff -- it isn't -- but there is a wealth of material on this subject readily available all over the internet (again especially on the Warhammer 40k sites). What there is a distinct lack of is insight on the ends and outs of game theory, balance and development.
That's what I really look forward to on Tuesdays -- the insight from designers on the mechanics and how to mess with them both as a GM and a player without through the whole machine out of kilter.
Now I wouldn't mind seeing more of this on say Wednesdays or some other day and appreciate the level of thought and dedication that is required for it (both in the making of the models and in writing about how to do it) -- but it wasn't what I'm expecting on Design Tuesdays from Paizo.
Just my two cents.
| Sean K Reynolds Contributor |
Not to complain...
...
Just my two cents.
From the first entry in this series:
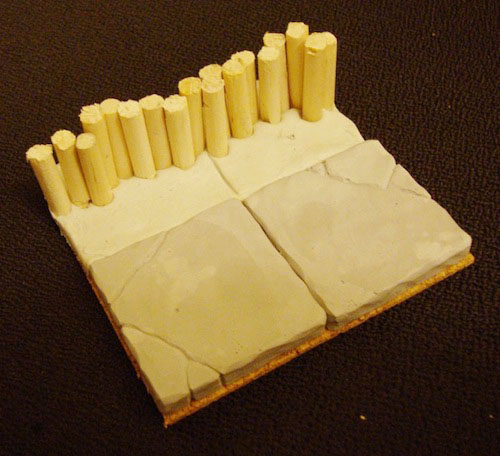
At PaizoCon this year I did a seminar/workshop introducing all sorts of things about making terrain for RPGs and wargaming. In between various demonstrations of hot wire foam cutting, casting bricks in dental plaster, mixing epoxy putty, and using polymer clay, I rattled off a bunch of websites with more information and/or product links. Here's a rundown on the terrain-building information and links for making foam terrain, just in case you missed the seminar.A question-reply to the second entry in this series:
Have these temporarily or permanently replaced design tuesdays?
These are cool, but I really liked design tuesdays.
They are just a temporary thing while we sort a few things out.
The week after PaizoCon, a bunch of people (including me) took days off and we needed some "filler" for the blogs. I had this material ready, so we used it.
| Dhampir984 |

we needed some "filler" for the blogs. I had this material ready, so we used it.
I like your filler. Keep posting filler. :)
| Abraham spalding |
Yup that's what I get for missing the earlier entries in the series. Again I don't mean to complain too much -- it is great information (and honestly the posts afterward are great help too pointing out how to find cheaper materials) just putting it out there.
After all while it's filler for now it might become something more regular later as it was well received. I certainly don't mind that -- but I enjoy being spoiled with Design Tuesdays much more. :D
| Sean K Reynolds Contributor |
I believe we'll get back to regular Design Tuesdays next week. Hmm, though we have Monday off for July 4....
| Abraham spalding |
lol that's fine I'll be out of town and possibly inebriated at the time so whatever works for next week!