Pathfinder Adventure Card Game Strategy #4—Choosing Location Decks
Tuesday, December 13, 2016
This is the fourth installment of our strategy blog written by game historian Shannon Appelcline. You can read all the installments here.
When you start playing a Pathfinder Adventure Card Game scenario, the first question you need to answer is which locations to send your characters to. You must decide whether to congregate (group the characters together) or separate (keep them apart).
It's usually better to keep your characters apart, to avoid the multiplicative effects of barriers and monsters that either damage everyone at a location or that cause everyone at a location to fight monsters. Spreading out also gives you the opportunity to temporarily close more locations when you find a villain. This is critical at the end of the game, but it can still be helpful early in the game since it limits the number of places that a villain can flee to, and limits the number of cards removed from the blessings deck if you lose the battle.
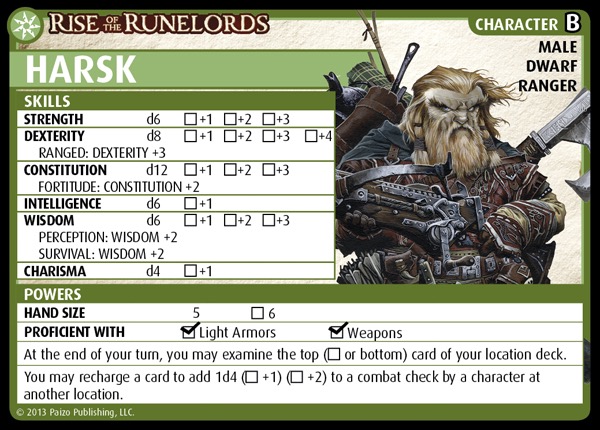
It's also better to keep specific characters apart from others if they're built to work on their own. Harsk is able to help characters at other locations, and Merisiel is a better fighter when she’s alone. Characters that have the Ranged skill generally tend to be better by themselves.

Does not play well with others.It's sometimes better to keep your characters together, particularly if they have cards or powers that allow them to help other characters at their location, or if they need to face a monster or barrier that requires multiple checks to defeat. In particular, many villains require two checks, so it's often helpful to attack a villain with two characters.
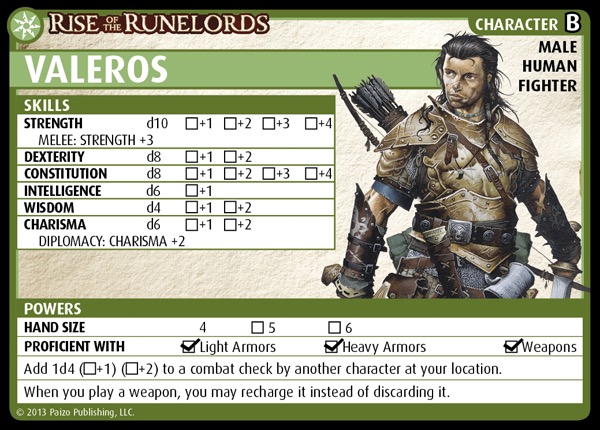
It's also better to keep specific characters together if they're built to work with others. Valeros and Lem are the prime examples of this, since Valeros automatically adds to combat checks at his location, and Lem can recharge cards to add to any check at his location.
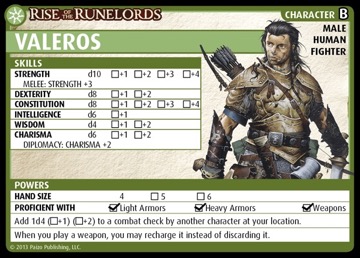
One is the by-the-book veteran one week from retirement. The other is the wise-cracking maverick with nothing to lose. Together, they fight evil.Corollary #1: Consider splitting up when you've closed two locations. If you have been keeping your characters together, consider splitting them up when you've closed two locations, because you should now have one character per open location—enough to temporarily close everything when you find the villain. Otherwise, really consider splitting up when you've closed three locations, because you now have enough characters to double-team one location or to keep helpers like Lem and Valeros with someone else.
However, the question of choosing location decks goes beyond whether you should congregate characters or separate them: you also need to select which characters to put at which locations!
Choose Based on Your Character and the Locations' Challenges
When you initially choose where to place your characters, do it based on the skills and cards of each character and how they interact with the specifics of an individual location.
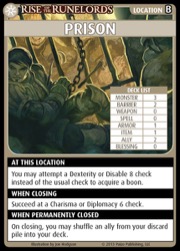
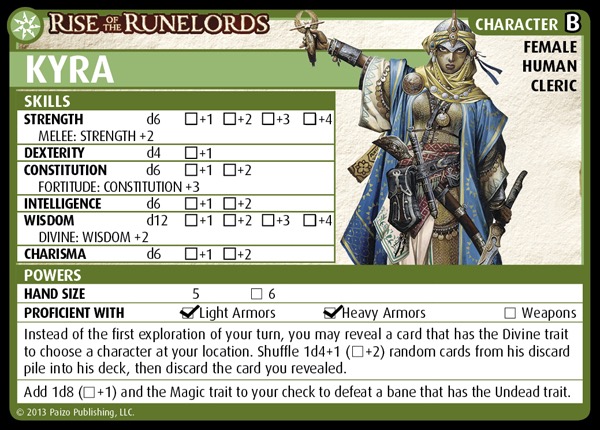
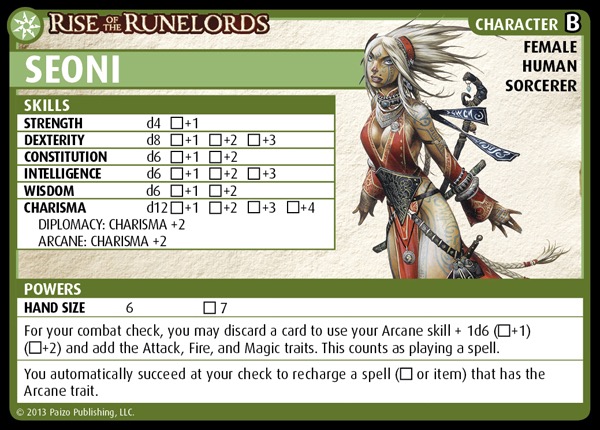
Corollary #1: Select characters able to deal with a location's closing conditions. Closing locations is one of the most important actions in the game. That's how you gain ground against the blessings deck countdown: by removing a location deck before you dig all the way through it, you reduce the total number of cards that you need to look at before you find the villain. This means the prime criteria for selecting where to put a character should usually be whether that character is good at closing that location or not. So you send Lem or Seoni to the Prison, because of their high Charisma skills, and you send Kyra or Seelah to hallowed (or unhallowed) ground, because of their high Divine skills.
You gotta get in to get out.Corollary #2: Select characters able to deal with a location's effects. Some locations, such as the Mountain Peak, have really painful effects. If one character can deal with them better than the others, send that person there. (This usually also plays into the former corollary, because special effects and closing conditions are often linked.) Thus, you could send Kyra to the Mountain Peak, because she has the Wisdom to deal with both the special effect at the start of the turn (which could cause her to bury a card) and the closing condition. Amiri is a less traditional choice, but very helpful because she can disappear from the Mountain Peak at the start of each turn; as it happens, her survival skill is also good for closing the location.
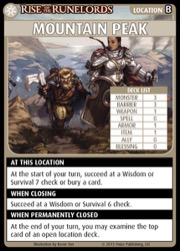
Yep—the answer to altitude is Wisdom.Corollary #3: Select characters able to deal with a location's cards. Finally, you can send a character to a location because they're the best able to deal with the cards there. If a location is full of monsters, send a bruiser like Valeros or Seoni rather than someone like Lini or even Harsk, who isn't as good at one-on-one combat. Similarly, if a location is full of barriers, Merisiel is often the best choice because of her high Dexterity and Disable skills (though specific barriers might call for Wisdom, Perception, or other skills).
Choose Based on Your Character and the Locations' Benefits
The flip side is that you can look at the benefits at a location and send the person who is most able to take advantage of them.
Corollary #1: Get the boons quickly! Quite simply: go to the locations with the most boons first, using the characters most likely to acquire them. If a location has a lot of blessings, send someone with a good Divine skill, such as Kyra; if a location has a lot of allies, send someone with good Diplomacy, like Seoni. This way, you can collect the good stuff before you fight the bad stuff... and if the game ends early due to excellent corralling of the villain, you'll have spent all of your time encountering boons instead of banes.
Corollary #2: Get the boons greedily! You can take a step further and go into full-on greed mode: send characters who are able to get the boons at a location even if they aren't that great at closing the location. This is a calculated risk, because it might keep you from winning the game. However, if a character’s deck is really lagging in a specific type of boon, it's often a good idea. And, you might get away with it and still win if you focus most of the other characters on challenges instead of benefits.
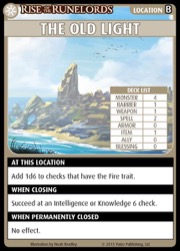
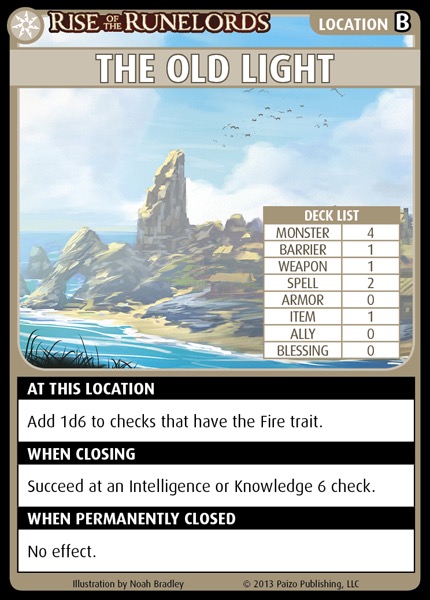
Corollary #3: Consider other benefits of a location. Very occasionally, locations will have beneficial special effects that are great for a specific character. The Old Light is probably the best example: it gives an extra d6 to checks that have the Fire trait, so it's a great option for Seoni, who has a power that adds the Fire trait to her combat checks.
Anybody got a light?When choosing how to match characters to locations don't use just one criteria; consider all of these options!
Next time: Moving to new locations.
Shannon Appelcline
Game Historian


We have updated our Privacy Policy.
Paizo.com uses cookies. You can block paizo.com from using cookies within your browser settings, but doing so will hinder site functionality.
More information can be found in our Privacy Policy.