


 baron arem heshvaun
|
| 1 person marked this as a favorite. |

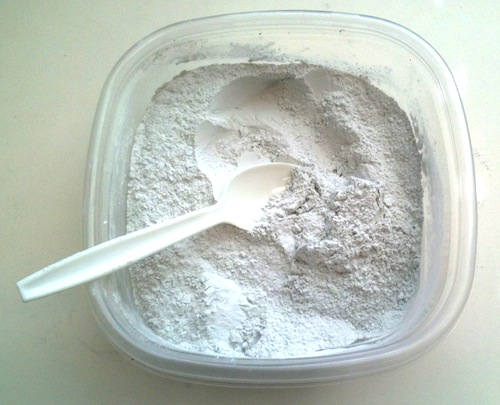
Excalibur dental plaster ... my mom is an oral surgeon ... all these years I had no idea I could purloin her casting putty for minis ! She's retired but the next time I'm in San Diego I shall be raiding her garage in hopes of finding material. I may even luck out and find a Nitruous Oxide tank.
Thanks for continuing the series Sean.

| vagrant-poet |

Have these temporarily or permanently replaced design tuesdays?
These are cool, but I really liked design tuesdays.
|
|

Have these temporarily or permanently replaced design tuesdays?
These are cool, but I really liked design tuesdays.
They are just a temporary thing while we sort a few things out.
Jason Bulmahn
Lead Designer
Paizo Publishing
| Justin Franklin |

I have to do some casting tonight actually.:) I have a Lepidstadt Courthouse to finish.
|
the Haunted Jester
|

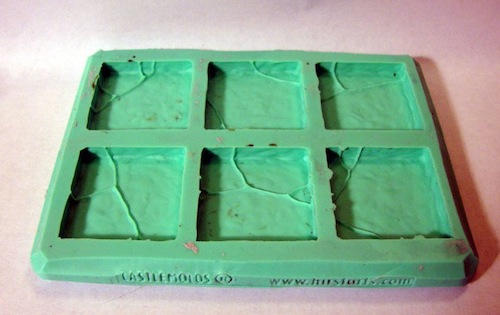
I have wanted to get into making the Hirst Arts structures for quite some time. Debating on waiting until I can take the beginners course at GenCon next year or to just start now. Love the article though guys!!
| Sean K Reynolds Contributor |
I didn't take a class, I just experimented after following Bruce Hirst's tutorials on the website. It's not that hard. :)
|
the Haunted Jester
|
I didn't take a class, I just experimented after following Bruce Hirst's tutorials on the website. It's not that hard. :)
Thanks for the boost Mr. Reynolds. Looks like I know what I am ordering next month!! :)
| Doc_Outlands |

Don't wait. If you wait, then once you *do* start, you'll realize how much fun you could have been having and how many awesome pieces you could have already turned out in the time you waited. The learning curve really is small, I promise. The molds also work with resin, if you like that instead of the various plasters.
I'd like to point out that the Hirst Arts' Egyptian line can make some great Mos Eisley-style architecture if you are a SW gamer, too. And some of the stuff works well with action figure displays.
| Dhampir984 |

I have a Lepidstadt Courthouse to finish.
Did you get the ziggurats finished yet?
| Justin Franklin |
Justin Franklin wrote:I have a Lepidstadt Courthouse to finish.Did you get the ziggurats finished yet?
2 more paint colors and some flocking and it will be done.
 Galnörag
|

I have a Lepidstadt Courthouse to finish.
You don't have your construction of that documented that you can share anywhere do you?
| Justin Franklin |
Justin Franklin wrote:I have a Lepidstadt Courthouse to finish.You don't have your construction of that documented that you can share anywhere do you?
I am going to try and do something once I am closer to or done.
| Senjen |

I have wanted to get into making the Hirst Arts structures for quite some time. Debating on waiting until I can take the beginners course at GenCon next year or to just start now. Love the article though guys!!
I discovered the Hirst Arts molds about 8 months ago while looking for less expensive alternatives to Dwarven Forge. At that time my last experience with plaster had been during elementary school nearly 30 years before. I started with a couple of molds to make sure that it was something I would enjoy before I spent a lot of money on it. In case you are wondering, the answer was yes, I enjoyed it a lot.
At this point I have acquired nearly 30 molds and poured over 100 pounds of plaster mix. If you are a person who thinks you will enjoy this kind of creative outlet then I cannot recommend it highly enough.
I do suggest starting with just 1 or 2 molds and using the cheap plaster you can find in hobby stores so that you can get an initial feel before spending money on the more expensive stuff. The molds are amazingly easy to work with and have a very high tolerance for newbie mistakes. Do your homework first so that you get one of the more versitile molds and read the instructions on the site and you will have a very hard time going wrong.
As a side note, while the message boards for Hirst arts are not as active as here, the people are very friendly and encouraging.
Try it now, I think you will enjoy it and will do fine without the hands on demonstration.

| Halidan |

I just want to echo Mr. Beadrsley. These blogs are really helpful. I've been painting and making terrain since the mid-70's, and it's still helpfull to return to the basics for a reminder or two.
BTW, what are design Tuesdays? I think I'm missing something here.
 Robert Hawkshaw
|

I just want to echo Mr. Beadrsley. These blogs are really helpful. I've been painting and making terrain since the mid-70's, and it's still helpfull to return to the basics for a reminder or two.
BTW, what are design Tuesdays? I think I'm missing something here.
The daily blogs are sort of themed and blogging responsibility divvied up, design Tuesdays are all about game design, rules and FAQ stuff.
| Halidan |
Thanks for the quick answer Robert. I useually don't read the blogs unless the title catches my eye. I think I'll have to pay more attention to them from now on.
| The Black Bard |

Wow, makes me feel old to realize I have Hirst Arts Molds from when he only had 10 different ones for sale. Have I really been doing this for 10 years now?
One trick I've learned through the years can solve two minor issues in one fell swoop, although you may want a 5 gallon bucket with a lid or two.
Simply: concrete.
Plaster of Paris can actually start to get expensive after a while, and dental plaster definitely so. And while dental plaster is great durability wise, Plaster of Paris it just doesn't cut it for pieces that are going to see use and wear. PoP pieces can be easily damaged with a fingernail, and while this can translate into a decided ease for carving, it can be a liability if butter-fingers or a random flying die get in the mix at the table.
So mix the PoP with concrete, in about a 50/50 mix. One bag of concrete will run you 3 dollars at the hardware store, which even after you filter out the small rocks, will leave you with over two gallons of the powder. The bricks you cast from what I call "Plascrete" will be much stronger, nearly impossible to damage with fingernails or dice, will resist breakage, and yet are still sculptable with proper tools. You'll double your effective plaster amount for a fraction of the cost, and increase durability immeasurably. Arguably, this is about 90% as durable as dental plaster, and often much cheaper and easier to get ahold of.
Some words of warning: Concrete has small rocks in it, which you can use for terrain details down the line, but need to be filtered from the powder to use the powder in a mix effectively (just try stirring and pouring into the molds with pebbles in the mix, not fun or efficient). You will need something to filter with and to filter into.
Which leads to the next issue: Filtering concrete is messy and dangerous. The powder takes to the air easily, and will settle all over the place. Absolutely filter outside if you can, or in the garage, or at least on a hardwood or tile floor. Use a filter that kicks up minimal dust: an actual filter like a strainer or such is far better than jury-rigging a terrarium cover screen like I did once. Never again.
You'll need a 5 gallon bucket to store your concrete in, which will eat up about 3.5 gallons of the space. A secondary tub for filtering might be nice as well, as well as a small container to store the useful pebbles. And finally, a container to store your Plascrete mix.
A lot of stuff and prep work? Maybe, although you probably have most of what you need already. A milk jug works for storing the plascrete, using the top of a soda two-liter as a funnel. Buckets cost about 5 dollars from the gardening center at major department stores, sometimes less at hardware stores. (They also make great storage for flour, sugar, and rice. Several in my kitchen.) Most have a strainer in the house, if only for pasta. Just make sure you strain it outside and wash off the strainer thoroughly.
Hope this helps someone!