Beginning Terrain-Making Blog, Part 1: Foam TerrainTuesday, June 14, 2011
At PaizoCon this year I did a seminar/workshop introducing all sorts of things about making terrain for RPGs and wargaming. In between various demonstrations of hot wire foam cutting, casting bricks in dental plaster, mixing epoxy putty, and using polymer clay, I rattled off a bunch of websites with more information and/or product links. Here's a rundown on the terrain-building information and links for making foam terrain, just in case you missed the seminar.
Building With Foam
Whether you want to make some movable hills, an elaborate cave system, or build an elaborate set piece that you'll use over and over again, styrene foam (such as Styrofoam) is the go-to material for building. It's light, inexpensive, reasonably durable for this purpose, and easily shapeable with a hobby knife or hot wire cutter. Although you can use common white styrene (technically, "expanded polystyrene," or EPS) for this, its cell-like structure is a little crumbly and may not give you the look you want. A better choice is a denser material called extruded polystyrene, which is stronger and smooth. You can buy it in hardware stores (such as TrueValue, Home Depot, and Lowes) where it's sold in large, rigid pink or blue sheets (typically 2 ft. by 8 ft.) for insulating walls, in 1/2-inch, 1-inch, and 2-inch thicknesses.
A Sturdy Base
Styrene is slightly flexible, and the underside can get scratched or gouged if you place it on a rough surface, so you should attach it to a harder, less-flexible base. Plywood is sturdy but heavy, so many modelers use fiberboard (often called "medium density fiberboard," or MDF), which is stronger than heavy cardboard but easier to cut than plywood. It's medium-brown, typically smooth on one side and rough like dried pulp on the other side. You can buy this at most hardware stores in large sheets (here is a link to it at Home Depot, though this is 1/2" thick and 1/8" thick is generally sufficient). In my experience it is easier to cut the fiberboard to the size you want for your terrain piece, then cut the styrene to match the base, rather than cutting the (softer) styrene and trying to cut the base to match that.
Time For Glue
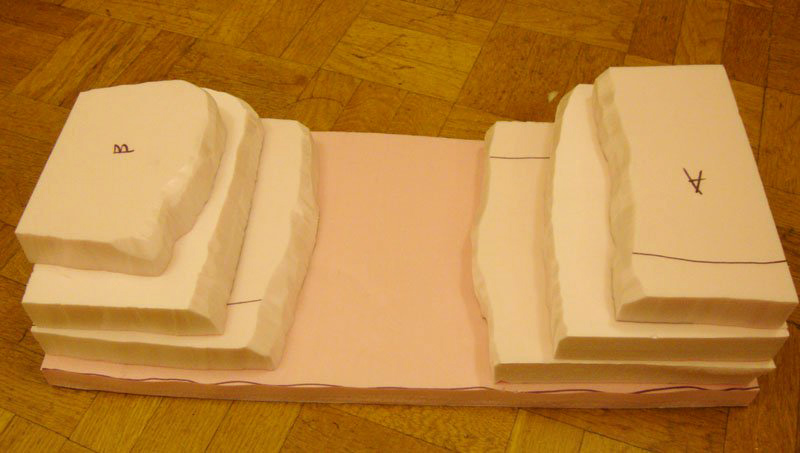 | |
| The cut foam, ready for gluing. | |
My terrain supplies box has a bottle of Gorilla Glue, Aleen's Tacky Glue and Elmer's white glue, all of which are available in hardware and/or craft stores. Gorilla Glue is good at affixing styrene to MDF, though it expands slightly so you need to stack books on top of it while it dries, as the foam is light enough that the expanding glue could form a gap between the MDF and foam. You can use tacky glue or white glue if that's all you have available, but the bond isn't as strong.
Cutting Foam
Once you've cut the base material and glued it to the foam, you need to be able to cut and shape the foam. The stuff is easy to cut with an X-Acto knife or a box cutter, though the thickness of the foam may make that a slow process. It's much faster and more fun to use a hot wire foam cutter, and if you plan to fiddle with foam on a regular basis, you should get a foam cutter. The principle of the foam cutter is it uses electricity to heat a metal wire, which slices through foam like a poor man's lightsaber. There are several types available:
The cheap: Often these are powered by D batteries (and drain them quickly), but there's at least one with an AC adapter. Look for the brand names "FloraCraft" or "Wonder Cutter." Retailing for under $20, they're of low quality and they don't cut very fast, but are an easy way to get started with foam-cutting.
The mid-range: The Woodland Scenics Hot Wire Foam Cutter is a little powerhouse and sells for under $50 (you can find it cheaper at Amazon.com and other online stores). It runs hotter than the cheaper cutters, allowing you to cut faster. I also like the wide "U" of the rigid bars, allowing you to cut thicker foam. You can even punch a hole in the foam, untie the wire from one end of the cutter, thread the wire through the hole, and reattach it to the cutter, allowing you to make interior cuts (like a pit in the middle of your terrain). The only drawback to this cutter is you have to hold the thumb-trigger in the "on" position (rather than having an on-off switch) when you use it.
The expert: The Hot Wire Foam Factory has an entire line of crafter and professional oriented foam cutters, including U-shaped cutters, cutting wands, flat cutting knives, and jigsaw-like cutting tables. I picked up the 4" hot knife, which lets me carve directly into the foam (for example, to create the appearance of bricks or mortared stone). These all require one of their power supplies, either a simple AC adapter for $11.95 or a more advanced model for $99.95 that lets you change the cutter's temperature.
This Stuff Will Kill You
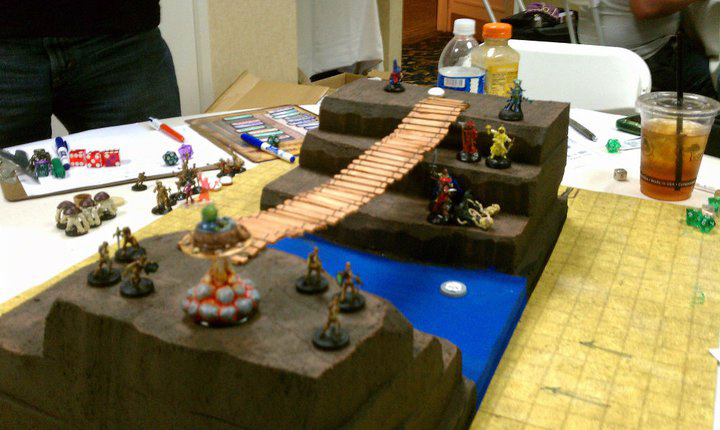
 | |
| Glued, painted, and ready for play. | |
One critical thing to remember is that styrene, when heated, gives off toxic fumes. Don't use a foam cutter in an enclosed space or with poor ventilation. If you don't have a filter mask, either work outside, in an open area, or with a fan blowing the fumes away from you. And remember that children and small pets are going to be more susceptible to the fumes because they're smaller than an adult. Play safe!
 | |
| In action at PaizoCon 2011! Photo by Blake Davis | |
Have An Example
The photos with this blog are of an incomplete foam terrain piece I used at PaizoCon. It's an elevated rise with a bridge over an underground river. The rise pieces are pink foam, carved with a foam cutter, and glued together with Gorilla Glue. I used a blunt pencil to draw a grid on the pieces (not a precise grid, as this looks less artificial), painted them with brown craft paint, painted a second layer of craft paint mixed with sand for texture, then drybrushed with a lighter brown to make the texture show up better. The "water" is currently just blue paint, but I'll be covering that with either a clear resin or layers of clear glue to make it shiny. The bridge is a picket fence from a craft store, stained a darker brown with dilute brown craft paint, and screwed into the top of the foam with long screws. Total building time, spread out over several weeknights, was about two hours, not including time for the glue to dry.
Sean K Reynolds
Designer